How to fix Chromatic Aberration
How to fix Chromatic Aberration
What is Chromatic Aberration?
“Chromatic Aberration is the effect produced by the refraction of different wavelengths of light through slightly different angles, resulting in a failure to focus.”
So in layman’s terms what this results to is a separation of the colours in white light due to a defect in the lens glass, this looks like a rainbow effect on the edge of features in an image. See example below:
There are several ways that you can reduce this:
a) If you are using a filter on the front of your lens try removing it. Take a picture with and without it on of the same subject and compare the results. Cheaper filters made of glass or plastic can increase the amount of CA (from now on I will just write CA for Chromatic Aberration).
b) Invest in better optics (lenses) the top range of lenses tend to be made from higher quality glass or crystal, this will have a major affect on the amount of CA in an image. Although it will be noticeably less there may still be some signs of CA.
c) Remove it in post production either in Lightroom or with Photoshop. Lightroom has a feature where you can use an eyedropper to sample the chromatic colour cast and it will try its best to remove it, the problem is it will remove that colour from the whole image and not just the select areas you want it removed from. I would recommend that you remove it selectively in Photoshop using the following method.
Step 1
Open your image in Photoshop.
Step 2
Duplicate your layer by pressing Ctrl/Cmd+J on your keyboard.
Step 3
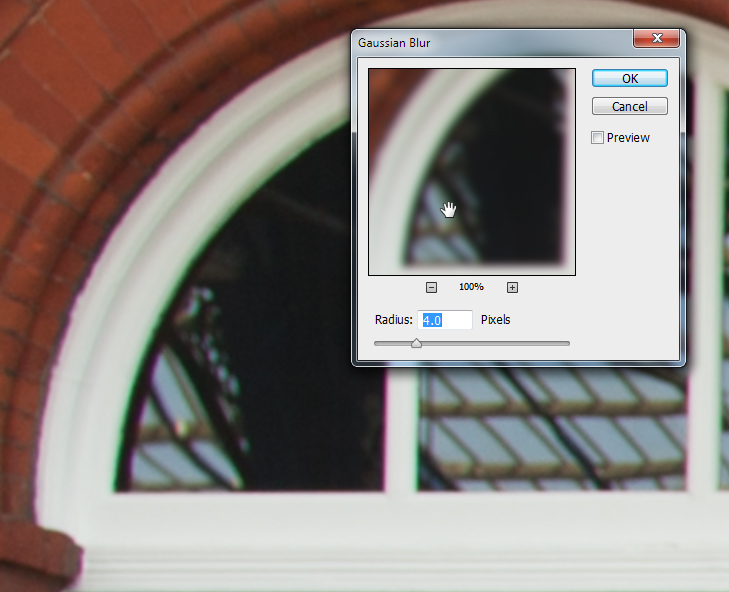
Go to Filter>Blur>Gaussian Blur…
The amount of blur you chose will depend on the image you are working on, you should blur it just enough so the edge detail is lost like the image below, once you are happy press OK:
Step 4
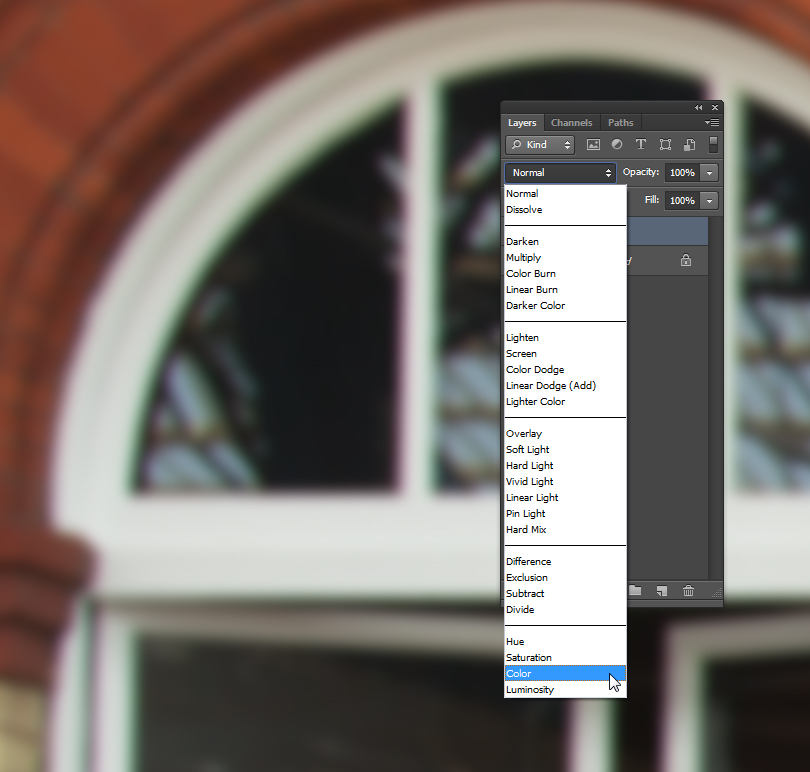
Go to the layers palette and change the blending mode of the blurred layer to “Color”.
You should now see that a lot of the CA has been removed, if not all of it. At the moment though it is applying this affect to the whole of the image, but we only want to apply it to the areas where there is CA.
Step 5
You must now add an inverted Layer Mask. This can be done by holding “Alt” on the keyboard as you press the “Add Layer Mask” icon as shown below:
You should then see a black layer mask appear next to your blur layer, the CA will reappear as you have now hidden this layer. We must paint back in the areas we want the CA to be removed from in white.
Step 6
Select the brush tool by pressing “B” on your keyboard.
Press “D” on your keyboard to select your foreground/background colours back to their default values.
Press “X” on your keyboard to switch the foreground colour to white.
Use the “[ and ]” buttons on your keyboard to quickly resize your brush and start to paint over where you want the CA to be removed.
Below you can see the areas I painted in on the mask for where I wanted to remove the CA, the second picture is before and the third is after.
As you can see most of the CA has gone, it doesn’t always clear it completely but if you wanted you could flatten the image by pressing Ctrl/Cmd+Shift+E on your keyboard and repeat the process from Step 2.
Alternatively you can merge it all up to a new layer by pressing “Ctrl/Cmd+Alt+Shift+E”. Repeat steps 2-4 and instead of re-painting a new mask you can grab hold of the last one you created, whilst holding “Alt” on the keyboard, drag it onto the new blurred layer and it will duplicate the mask for you.
I hope this tutorial helps you, if it does please remember to comment below and share the tutorial!


